Tuesday, September 23, 2008

Extra Credit in Grade Center

There is a known issue in Bb 8 where this isn’t calculating correctly. The workaround is to modify the total column to include each of the individual columns instead of leaving the default of all columns option selected.

To do this:

1. Go into the Grade Center

2. Click the column name for your total grade

3. Select modify column

4. In step 3, choose the "Select Grade Columns, Calculated Columns and Categories" option

5. Select all columns (including the extra credit column) and click the arrow for these to be included in the final grade.

6. Click submit

The total column should now be including the extra credit column.

Tuesday, March 4, 2008

Be Authentic

Moving Beyond Traditional Assessment

How do you know when a student has truly learned something? Testing an isolated skill or a memorized fact does not effectively measure a student's capabilities. In order to accurately evaluate what a person has learned, an assessment method needs to examine his or her collective abilities. This is authentic assessment.


Authentic assessment presents students with “real-world” challenges that require them to apply their relevant skills and knowledge. It measures their ability to perform a task in the way professionals in the field would perform it. Evaluation is based upon how well the learner demonstrates the behavior the learning is intended to produce.

The table below compares the attributes of traditional and authentic assessment on a continuum. While assessments do vary considerably in the forms they take, traditional assessment usually fits into the attributes on the left side of the continuum and authentic on the right.

This does not mean that traditional forms of assessment (multiple choice, fill-in-the-blank, true/false, and matching tests or quizzes) should not be used. Traditional and Authentic assessments can be used together in different combinations to gauge learning. The key is determining which method is most appropriate for the material being taught. Look at this example from Authentic Assessment Toolbox by Jon Mueller:
“…if I had to choose a chauffeur from between someone who passed the driving portion of the driver's license test but failed the written portion or someone who failed the driving portion and passed the written portion, I would choose the driver who most directly demonstrated the ability to drive, that is, the one who passed the driving portion of the test. However, I would prefer a driver who passed both portions. I would feel more comfortable knowing that my chauffeur had a good knowledge base about driving (which might best be assessed in a traditional manner) and was able to apply that knowledge in a real context (which could be demonstrated through an authentic assessment).”

Whether you choose to use traditional assessment, authentic assessment, or a combination, remember that assessments should be designed so that student learning is clear (measureable) and directly related to the learning competencies. Also, remember to provide your students continuous feedback throughout the course, using both formative and summative assessments.

Helpful resources:

View new postings

Ever wanted just to view new Discussion Board postings?

This can be done in Blackboard's discussion board.


When you go in to the Discussion board, there is a column for number of unread postings.
If you click the number link you'll be taken to a page with only the unread postings for that board. Once you read them, you can then select all and mark them as read.


Give it a try!

Tuesday, February 12, 2008

No odd symbols

Submitted assignments should not have odd characters in the file name

Some of you tried the tip from last week and then ran into a snag. Here's what is going on and how to avoid it.

If an assignment submission has an odd character like the slash (/), pound sign (#), etc. and you attempt to download multiple submissions in a zip file, Blackboard will give an error message.

Tell your students not to use these characters in the file name when they upload and submit assignments. Blackboard advises to only use alpha, numeric and underscores in any file name uploaded to the course. This will ensure success when you download them all at once.

If students have already submitted, the workaround is to rename the assignment submission (not the grade book item), removing that character, then try again. Or you can download that student's submission individually.

Happy Downloading!

Thursday, January 31, 2008

Do it all at once!

Did you know you can download submitted assignments all at once?

For each assignment you have in Blackboard, you can download all student submissions simultaneously.

How To:

From your course go into the Control Panel and into your Grade Book
Click on the Title of the Assignment
Click on Item Download

Student names have been hidden on this screenshot.

Click on Select Ungraded
Click Submit
When the page refreshes, there will be a link to Download assignments now

Click the link
Click Save
Navigate to where you want to save the file
Click Save
This is a zip file. You'll now need to unzip the file to access each student's assignment.

To unzip folders:

Double click the zip folder to open it
On the left side, click extract files

Click Next 2 or 3 times from the wizard
Click finish
Your folder will open up with the unzipped files.
The unzipped folder is in the same location as the zip folder so you can find it later.

You can now open and grade the assignments individually and submit the grades to the grade book in Blackboard.

Tuesday, January 15, 2008

Have it delivered!


Discussions delivered to your inbox

Do you use the discussion board in your Blackboard online courses? Wouldn't it be nice to know when someone makes a post to it? Well, now you can! Think subscription.

We are now on version 7.3 of Blackboard. In this version you have the option of allowing users subscribe to an entire forum. When they subscribe to the forum, a notification is sent to their KCTCS Outlook inbox. You can't reply to the discussion from the inbox, but it does let you know that things are going on.

Setting it up

When creating your forum you'll see these options:

Allow members to subscribe to threads - If you choose this option, users must subscribe to every thread in a forum to get email notification.

Allow members to subscribe to forum - This option will send an email notification for every thread in the forum. If you choose this option, you then have the option of what is sent in the email; the body of the post or a link to the post.

Subscribe

Now that you have added the option for subscription, here's how it will work from a users perspective:

When the user enters the discussion they will have a Subscribe button on the action bar. (NOTE: It will be on the main forum page if you let them subscribe to the forum. If you set it to subscribe to the thread, then it is on the action bar for the thread.)


Just click on the Subscribe button. Discussion postings will now be delivered to your inbox.

Unsubscribe: if you want to unsubscribe, just go back to where you subscribed and click the unsubscribe button.

Tuesday, January 8, 2008

Please release me

Release content to students based on performance

Did you know that you can release additional content to students based on their performance in the course? Well, you can. This option is called Adaptive Release.

Adaptive Release can be used in a variety of ways. Let's look at a few examples of when you might choose to use it.

Examples

1.) You want students to pass a syllabus quiz before access any course content.
2.) You don't want to overwhelm students by presenting them all the course content at once at the beginning of the semester.
3.) Students must achieve a passing grade on a test before moving on to the next unit of content.
4.) You give a test on, let's say, fractions. You have a couple students who didn't do so well on the exam but they need to grasp fractions before they move on to the next unit.

These are all examples of when you may want to use the Adaptive Release feature. Now we'll take a look at how Adaptive Release would work for each of these examples.

Results

1.) You can set up a quiz on the syllabus and once they achieve a certain grade (set by the instructor) then the course content opens up.
2.) When students login to the course, they only see the first unit/module/chapter. Then after they complete a quiz on the unit, the next unit opens.
3.) You allow students to take a quiz multiple times until they've mastered the content and achieve a passing grade. Once they get the passing grade, the next unit of content opens.
4.) When a student doesn't pass the test on fractions, then supplemental content is opened up for them to brush up on fractions.

These are only a few examples of when you may want or need to use adaptive release. There are plenty more reasons you may decide to use it.

So, what do you think? Would you like to know how to adaptively release items in Blackboard?

It is pretty easy. You do need to have your content uploaded into Blackboard before you add the Adaptive Release.

  1. Click the Manage button to the right of the item that you want to hide until criteria is met to release it.
  2. Click Adaptive Release
  3. You have 4 options for releasing content. You can release by date, membership, gradebook item, or review status. The examples mentioned above were all examples of the gradebook item.
  4. If you are using a gradebook item, click the dropdown list to select the gradebook item that they need to complete. The number in the bracket at the end of the title is the number of points that item has.
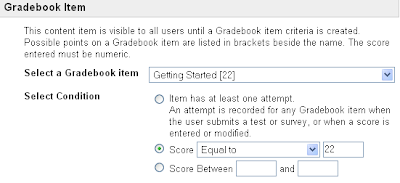
  5. When setting the score make sure to use points and not percents.
  6. Click submit
Now when students meet the criteria you set, the new item will be opened for students.

Thursday, January 3, 2008

Where's my delete button?

How do I get rid of this content?

You may have noticed that you no longer have a delete or remove button in your eContent area. So, how do you remove old content if you don't have a delete button? Well, Blackboard has a new feature in the content area called "recycle bin". When you want to delete things, put the checkmark in front of the item then click "recycle".

This will move your content to the recycle bin. Like the recycle bin on your computer, this will let you restore something if you get rid of it by accident.


You have to be looking at your navigation bar with the folder view before you'll be able to see the recycle bin. If you need to retreive something from the recycle bin, click on it and you'll see the files you recycled. You then have a button to restore if you need to put it back.