Do you post PowerPoint lectures with voice narration to Blackboard? Adding voice narrations in Powerpoint can create very large files. In an effort to decrease file size, the amount of space taken up in your course and also download time for students, consider using authorPOINT Lite. This free tool compresses the files and makes them flash files. This allows for an expedited download process for the students.
Go here http://www.authorgen.com/ and download the free authorPOINT Lite.
Using the Program
- Once it is installed on your computer, open the program (authourPOINT Lite).
- Click import
- Browse to find your PPT file
- Once your ppt file is listed in the import box click Import Now at the bottom.
You can change the save location if you want.
Once it has been imported (converted) you’ll take the files it produced and put them in Blackboard.
Uploading to Blackboard
Directly in the course
If you put files directly in the course here’s what you’ll need to do.
- Go to where you saved the import. Inside the folder for the import, you’ll see 2 folders. One is called powerpoint and the other is called ap Lite flash. The ap Lite flash folder is the one you want.
- You can rename the folder if you want.
- You need to zip this folder. (right click on the folder, slide to send to and choose Compressed (zipped) Folder)
- Now go to Blackboard and click add item in the content area where you want the file.
- In step 2 browse your local hard drive to find the zip folder and select it.
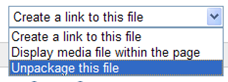
- Then (still in step 2 in Bb) there is a dropdown list for what you want to do with the file. You want to select Unpackage Document.
- Set the other settings as you’d like and click submit.
- Then you are going to be presented with a list of files. These are the files in the zip folder. Bb wants to know what is the first page it should display. You need to find and select index.html.
- Then submit.
Your file is there and ready to go.
In the eContent Collection
If you put your files in the eContent Collection you don’t need to zip the file.
- Go to eContent Collection and click on the web folder button from the menu to open the folder.
- Then drag the AP Lite Flash folder (or whatever you renamed it to) into your eContent collection folder.
- Now you need to set the permissions for this folder so your class has access to all the content. (if you don't know how to set permissions, watch this video http://elearning.kctcs.edu/bbcswebdav/institution/eLearning%20Technology%20Tutorials/ePortfolio/uploadfiles/uploadfiles.html)
- Once it is there, go to your course and click on add item in the content area where you want the file. .
- Select to link to content collection.

- In the content collection you’ll also be looking for the index.html file that is in the folder you just uploaded. Select the index.html files.
- Submit
Your file is there and ready to go.