Monday, December 10, 2007
Where did it go?
We've been seeing where tools are getting turned on and off in course shells. Although we haven't figured out what is causing it, we do know how to correct it. You can actually correct it yourself.
All tools are controlled through the control panel under Manage Tools in the Course Options area.
Click on Manage Tools.
You now have three areas of tools; Tool Availability, Building Block Tool Availability and Content Tool Availability.
You should check each of these areas to make sure you have the tools you want to use turned on and the tools you aren't using for class turned off.
Monday, December 3, 2007
Is that what it means?
In Blackboard, you'll occasionally see text around an option or item that isn't necessarily clear. One of the best examples of this is the text surrounding an option for giving a test. In step 3, Self-Assessments, of modifying options for the test you have an option to Hide from the grade book. Upon first glance of this option, it seems like the option to select if you want to hide the grade from the students' grade book.
Stop right there! Notice this is under the sub-heading of Self-Assessments. So really what this option does is hide the grade from the instructor's grade book. Then when the instructor realizes their mistake and goes to remove this option they are faced with the dilemma of removing all submitted tests. If you do this, you've deleted all the submitted tests for that assessment and they can't be retrieved for you.
Can it be clarified? Yes, and we are asking for your help. We can edit any of the preset text in Blackboard. KCTCS has now edited the option mentioned above to make it more clear. Here is how it reads now:
If that image is too hard to read, here is the new text;
Hide the score of this test from the Instructor Gradebook.
If this item is checked, then the scores will not be included in the instructors Gradebook nor can they be retrieved by System Administrators. (This is used for self-assessment.) To hide this item from the student's gradebook, this must be done in the gradebook area. --Now doesn't that make more sense?
You can help! Here's where you can help and give us your suggestions. Let us know any area of Blackboard where the wording is confusing and/or unclear. We will then take a look at it and try to make it better. You can send suggested text too. Just email elearningsupport@kctcs.edu with the subject line of check that wording. Then let us know where in Blackboard the change needs to be made, what it says now and what you suggest. We'll let you know if the change will be made and when.
Thanks for helping out!
Wednesday, November 21, 2007
Keep it clean!
Messages
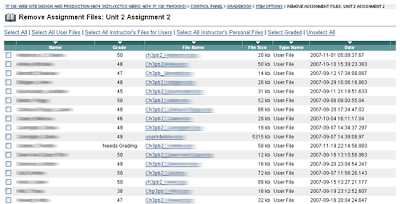
- To delete attachments to assignments, go into your gradebook in Blackboard.
- Click on the title of the Assignment
- Click on Item File Cleanup
Student names have been blurred out for privacy
- This screen will show you the student name, grade, file name and file size. You can delete all the attachments or just the large ones (over 1000kb).
- To delete all click on the Select All button or just click the check box in front of the ones you want to delete
- Remember, this doesn't delete the column in the gradebook or their grade. It only deletes the attachments.
- Click delete at the bottom to complete the process.
Happy Cleaning.
Monday, November 12, 2007
Back-up that Grade Book
Grade book back-ups
Things happen - especially when dealing with technology. Just as you should back-up your documents on your computer, you should back-up grades in your online course. Do not depend on the system for this. As an instructor, grades are your responsibility so take the actions needed to preserve them.
Don't ask "how often should I back it up?" This is going to depend on the instructor and the course. For example, if you have weekly assignments and grades then you should back-up weekly.
It only takes a few minutes to back them up them from Blackboard. Once they are backed-up, the file can be open and viewed by a spreadsheet program like Microsoft Excel.
How To:
- Go into your course
- Click on the control panel
- Click on the grade book
- Click on the Download Grades button
- Select comma or tab delimited. If you aren't sure about them, it doesn't really matter if you chose comma or tab delimited as the back-up file. Either can be opened by a spreadsheet program.
- Click Submit
- When completed, click download to save to your computer
- Navigate to where you want to save the file on your hard drive and save it
Your grades have now been backed-up
When you need to access this file, simply locate it on your hard drive and open it up. It will open with your spreadsheet program. If you don't have one, you can open it with google docs or open office.
Tuesday, November 6, 2007
Let the games begin!
Don't think you have the time to create interactive games for your class? Do you know how to use PowerPoint? If so, creating games can be easy. Especially when you have the templates provided by a few faculty from the University of Wisconsin Whitewater.
You'll find 15 or so templates for different activities you can create for your class everything from flash cards to bingo to scavenger hunts and jeopardy. Ready to see for yourself? Here's the link http://facstaff.uww.edu/jonesd/games/index.html.
Give it a try and pass the word.
Monday, October 29, 2007
My Organization Plus
Add/remove enrollments to community
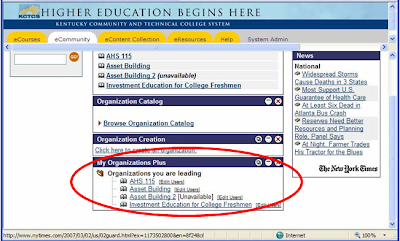
Have you ever needed to put someone in your community or remove someone from a community? We have a building block tool for Blackboard that will allow this. It is called 'My Organizations Plus'. This tool will allow you to control user access to your community.
From the eCommunity area you should now have a “My Organization Plus” module on the page.
This module will allow you to add/remove users from Organizations/Communities. Removing users will remove them from the gradebook.
To utilize this, simply click on the Edit Users link next to the Organization.
To add users
- click the add users button
- add the user id for those you want to add
- set the role for that user
- click modify.
- put a check in the box to the left of their name
- click modify at the bottom right of the screen
Monday, October 22, 2007
bFree
Have you ever wanted to convert your Blackboard course into a stand alone website? The University of North Carolina - Chapel Hill has created a free software tool that will do just that.
You simply download and install the software onto your computer. Then archive or export your course from Blackboard and download it to your computer. Run your archive/export through bFree and it'll give you a standalone website of your course.
It will extract course content, text, announcements, forums and group/course uploaded documents that are directly in your course. (It does not currently pull files linked from the content collection.)
For more information or to download the software, visit their website at http://its.unc.edu/tl/tli/bFree/index.php.
Monday, October 15, 2007
Compress Powerpoint with voice files
Do you post PowerPoint lectures with voice narration to Blackboard? Adding voice narrations in Powerpoint can create very large files. In an effort to decrease file size, the amount of space taken up in your course and also download time for students, consider using authorPOINT Lite. This free tool compresses the files and makes them flash files. This allows for an expedited download process for the students.
Go here http://www.authorgen.com/ and download the free authorPOINT Lite.
Using the Program
- Once it is installed on your computer, open the program (authourPOINT Lite).
- Click import
- Browse to find your PPT file
- Once your ppt file is listed in the import box click Import Now at the bottom.
You can change the save location if you want.
Once it has been imported (converted) you’ll take the files it produced and put them in Blackboard.
Uploading to Blackboard
Directly in the course
If you put files directly in the course here’s what you’ll need to do.
- Go to where you saved the import. Inside the folder for the import, you’ll see 2 folders. One is called powerpoint and the other is called ap Lite flash. The ap Lite flash folder is the one you want.
- You can rename the folder if you want.
- You need to zip this folder. (right click on the folder, slide to send to and choose Compressed (zipped) Folder)
- Now go to Blackboard and click add item in the content area where you want the file.
- In step 2 browse your local hard drive to find the zip folder and select it.
- Then (still in step 2 in Bb) there is a dropdown list for what you want to do with the file. You want to select Unpackage Document.
- Set the other settings as you’d like and click submit.
- Then you are going to be presented with a list of files. These are the files in the zip folder. Bb wants to know what is the first page it should display. You need to find and select index.html.
- Then submit.
Your file is there and ready to go.
In the eContent Collection
If you put your files in the eContent Collection you don’t need to zip the file.
- Go to eContent Collection and click on the web folder button from the menu to open the folder.
- Then drag the AP Lite Flash folder (or whatever you renamed it to) into your eContent collection folder.
- Now you need to set the permissions for this folder so your class has access to all the content. (if you don't know how to set permissions, watch this video http://elearning.kctcs.edu/bbcswebdav/institution/eLearning%20Technology%20Tutorials/ePortfolio/uploadfiles/uploadfiles.html)
- Once it is there, go to your course and click on add item in the content area where you want the file. .
- Select to link to content collection.
- In the content collection you’ll also be looking for the index.html file that is in the folder you just uploaded. Select the index.html files.
- Submit
Your file is there and ready to go.
Monday, October 1, 2007
Blackboard and email
Do you ever check your junk mail folder? Have you found your emails from Blackboard there? This is where many Blackboard emails end up. If this is happening to you, you just need to tell Outlook that this isn't junk mail.
There are a couple ways this can be accomplished, but I'm going to show you how to make sure any email from Blackboard comes to your inbox and not your junk folder.
- Open Outlook
- Click the Tools menu
- Slide down and click Options
- From the Preferences tab, click the Junk E-mail button
- Now click the Safe Sender tab
- Click the Add button
- Type in @kctcs.edu
- Click the OK button (this is on the screen where you entered the @kctcs.edu)
- Click the OK button on the Safe Senders tab
- Click the OK button on the Options screen
Tuesday, September 25, 2007
Banners with Powerpoint
Ever wondered how you can create a banner for your course? PowerPoint could be your answer. Not everyone has image creation/manipulation program but most of us not only have access to PowerPoint, we know how to use it – at least as a presentation tool.
CREATE
2. Go into the page setup area
a. 1997-2003: file to page setup
b. 2007: Design tab to page setup
3. In the “slides sized for” dropdown list choose banner
4. Click Ok
5. Create the banner using PowerPoint tools. Add
the background, text, images, word art, smart art, whatever you want.
SAVE
1. File to Save
2. Navigate to where you want to save the file on your hard drive
3. Give the file a name (NO SPACES – files that are to be placed in Blackboard should not have spaces)
4. In the “Save as type” dropdown list change this to GIF or JPEG file type
a. GIF is generally used if you use clip art images
b. JPEG is generally used if you use photos images
c. If you aren’t using images, save it as GIF
5. You now have the image file and you are ready to put it in Blackboard
Now that you have your banner, you need to upload it into your course in Blackboard. The Banner appears on the Announcement page of your course.
1. Login to Blackboard and go into your course
2. Go to control panel to Course Design (in the Course Options area) to Course Banner
3. Click the Browse button to the right of the New Banner Image area
5. Select the file (double click it or click it once then click open)
6. Now you are back in Blackboard and your file path is listed in the New banner image area
7. Click Submit
8. Your banner has now been added to your course
To see your new banner, click the first link in the breadcrumbs to get back to the announcement page of the course.
Monday, September 10, 2007
TIP: Customize your course list
For example, sometimes you may have several courses listed on your course page that you no longer need. These can be old courses, training shells or development shells. You can set these courses to not show on the portal. This doesn't delete the course or make it unavailable to students - this is only for your view of your course module. Students can also use this to turn off old courses.
You can also use this to turn on what you see about the course like the course id (course code), announcements, tasks or the calendar for the course.
To change your course settings in the module, click on the pencil icon in the title bar of the course list module.
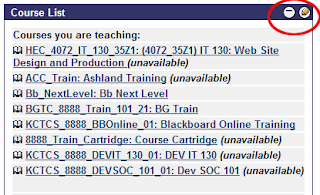
Once you've clicked on the pencil icon, use the check boxes to set what you see for a particular course. You can uncheck everything for a course to remove it from your course list or select the check boxes for what you want to see.
Click submit at the bottom of the page when done.
You will now notice the changes in your Course List module on the first page.
Questions about this tip? email me
Saturday, September 8, 2007
Welcome to eTips
Welcome to the eTips blog. This blog will be used to post tips for online learning. A new tip will be posted each week. These tips will cover a variety of topics about eLearning. Whether your class is web-enhanced, hybrid or completely online, these tips are for you.
You'll find tips about using Blackboard, content creation, tools for teaching online andanything in between.
I hope you find this a valuable resource. Email your tips in to be shared with everyone.