Ever wondered how you can create a banner for your course? PowerPoint could be your answer. Not everyone has image creation/manipulation program but most of us not only have access to PowerPoint, we know how to use it – at least as a presentation tool.
Check out these steps for using PowerPoint to create a banner.
CREATE
1. Open PowerPoint
2. Go into the page setup area
a. 1997-2003: file to page setup
b. 2007: Design tab to page setup
3. In the “slides sized for” dropdown list choose banner
2. Go into the page setup area
a. 1997-2003: file to page setup
b. 2007: Design tab to page setup
3. In the “slides sized for” dropdown list choose banner
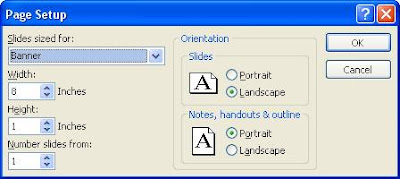
4. Click Ok
5. Create the banner using PowerPoint tools. Add
the background, text, images, word art, smart art, whatever you want.
Your banner is now created. Now you need to save it and upload it to Blackboard.
SAVE
1. File to Save
2. Navigate to where you want to save the file on your hard drive
3. Give the file a name (NO SPACES – files that are to be placed in Blackboard should not have spaces)
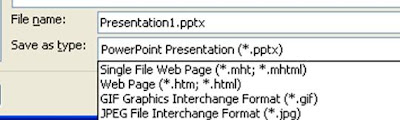
4. In the “Save as type” dropdown list change this to GIF or JPEG file type
a. GIF is generally used if you use clip art images
b. JPEG is generally used if you use photos images
c. If you aren’t using images, save it as GIF
5. You now have the image file and you are ready to put it in Blackboard
UPLOAD
Now that you have your banner, you need to upload it into your course in Blackboard. The Banner appears on the Announcement page of your course.
1. Login to Blackboard and go into your course
2. Go to control panel to Course Design (in the Course Options area) to Course Banner
3. Click the Browse button to the right of the New Banner Image area
 4. Navigate to where you saved your banner on your hard drive
5. Select the file (double click it or click it once then click open)
6. Now you are back in Blackboard and your file path is listed in the New banner image area
7. Click Submit
8. Your banner has now been added to your course
To see your new banner, click the first link in the breadcrumbs to get back to the announcement page of the course.

